
- 1.Introduction
- 2.Technical Data
- 3.Safety Overview
- 4. Control Panel & Basic Functions
- 5. Connectivity
- 6. WebGUI User Interface
- 7. Player
- 8. Scheduler
- 9. Pixelshift
- 10. Camera and Scanner
- 11. Mask
- 12. Audio
- 13. Quick Walkthrough of a Basic Video Mapping with the Lumitrix T2 Projector
- 14. Correct Outdoor Positioning
- 15. Attachment System
- 16.Maintenance
- 17. Troubleshooting
- 18. Technical Support
- 19. Software Upgrade
 1.Introduction
Let's have a look at your new automatic outdoor projection device Lumitrix T2. As for other Lumitrix T Series devices, Lumitrix T2 is a smart tool designed for long-run outdoor decorative illumination. We hope that this machine will help you produce some great light shows that will impress your customers! Please, read this manual carefully in order to make sure that you use your new machine properly. Feel free to contact us with any additional questions. LUMITRIX strongly recommends to order product training for your crew. The Lumitrix T2 Projector (from now on also referred to as "Projector") is a complex device that requires professional handling. Contact support@lumitrix.eu.
 2.Technical Data
| Input Voltage | 230 V ~ 50 Hz |
| Power Consumption | 550 W |
| Operating Temperature | from -15° C to +35° C |
| Ingress protection | IP43 |
| Overvoltage Protection | power supply, LAN, audio |
| Dimensions [mm] (H x W x L) | 250x675x530 |
| Weight | 23 kg |
| Display Type | DLP |
| Lamp Life | 2.500 h |
| Brightness | 6.000 ANSI Lm |
| Native Resolution [px] | 1920x1200 (WUXGA) or 1024x768 (XGA) |
| Aspect Ratio | 16:10 or 4:3 |
| Throw Ratio (lens) | 1.07 - 1.71 or 1.50 - 2.40 |
| Camera | 5 Mpix (night vision) |
| Audio Output | 2x XLR balanced audio |
| Wireless Control Channels | GSM (2G/3G/4G), Wi-Fi |
| Video Memory | 20 GB |

 3.Safety Overview
- Failure to read and follow the below-specified instructions may result in fire, personal injury or damage to property.
- Do not use the Projector if damaged and do not try to dismantle it, there is a risk of electric shock!
Weather protection and positioning
- The Lumitrix T2 Projector is weather protected (for more details see IP43 https://en.wikipedia.org/wiki/IP_Code ) and designed to operate outdoors within the following operating temperature range: from - 15º C to + 35º C. If the environment temperature exceeds the allowed limit, the Projector will not display show. The Projector will continue working after the temperature returns to the operating range.
- The Projector must not be exposed to splashing water. No objects leaking water may be placed on the top of the Projector.
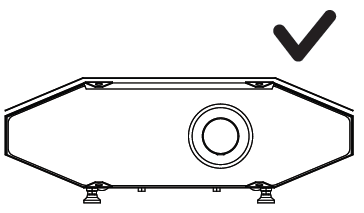
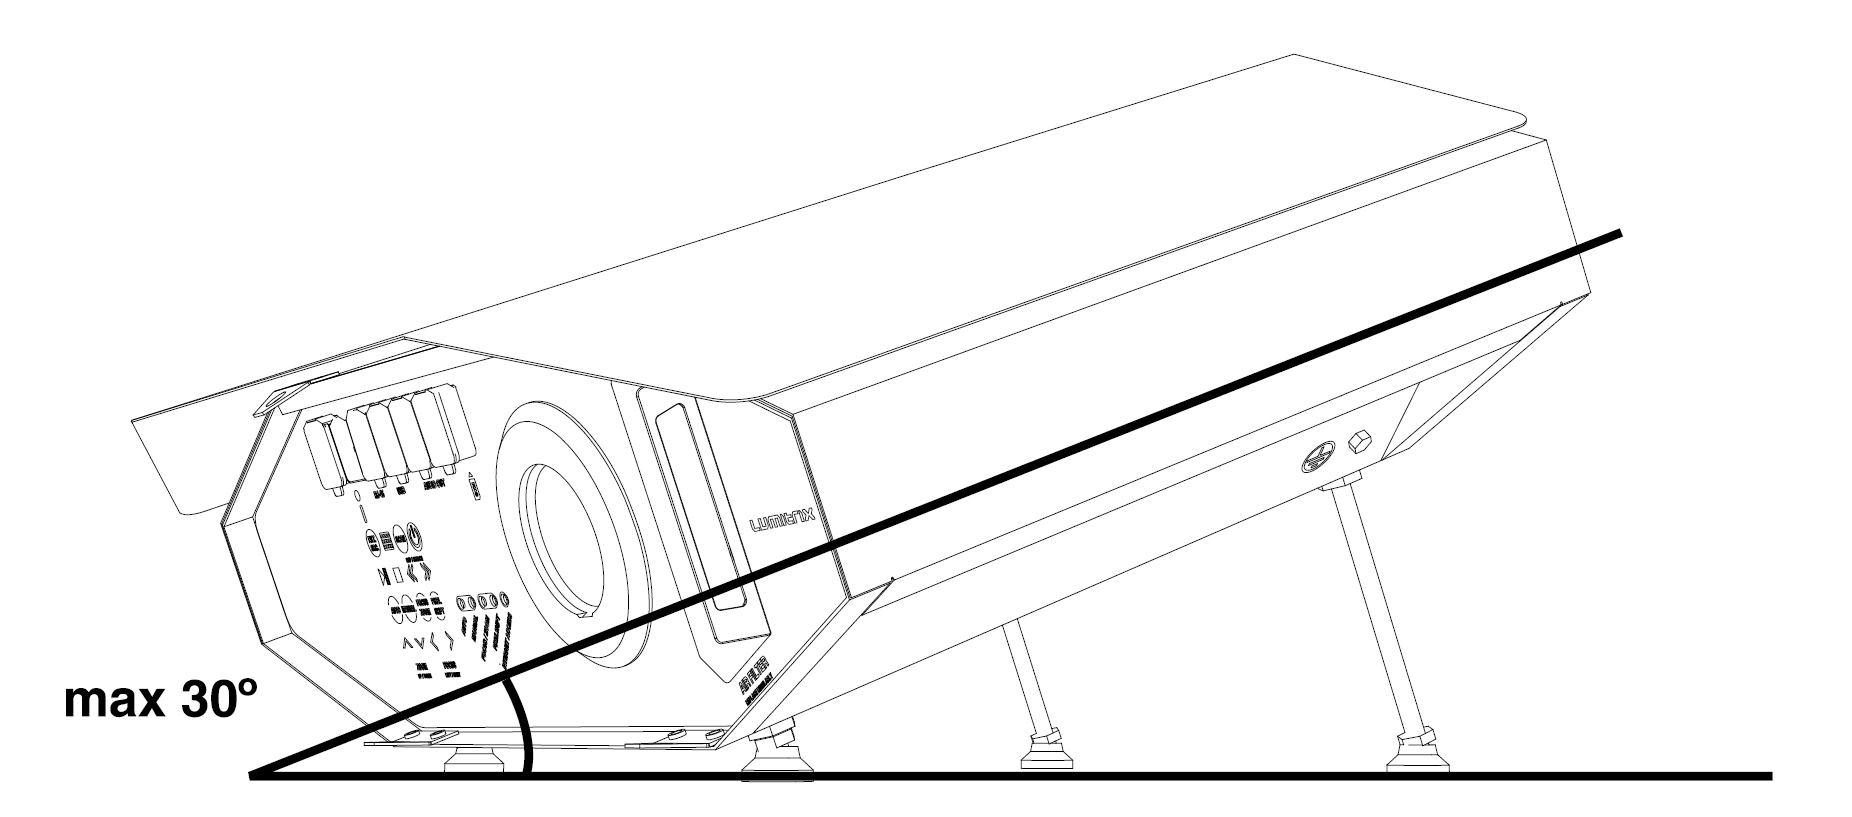
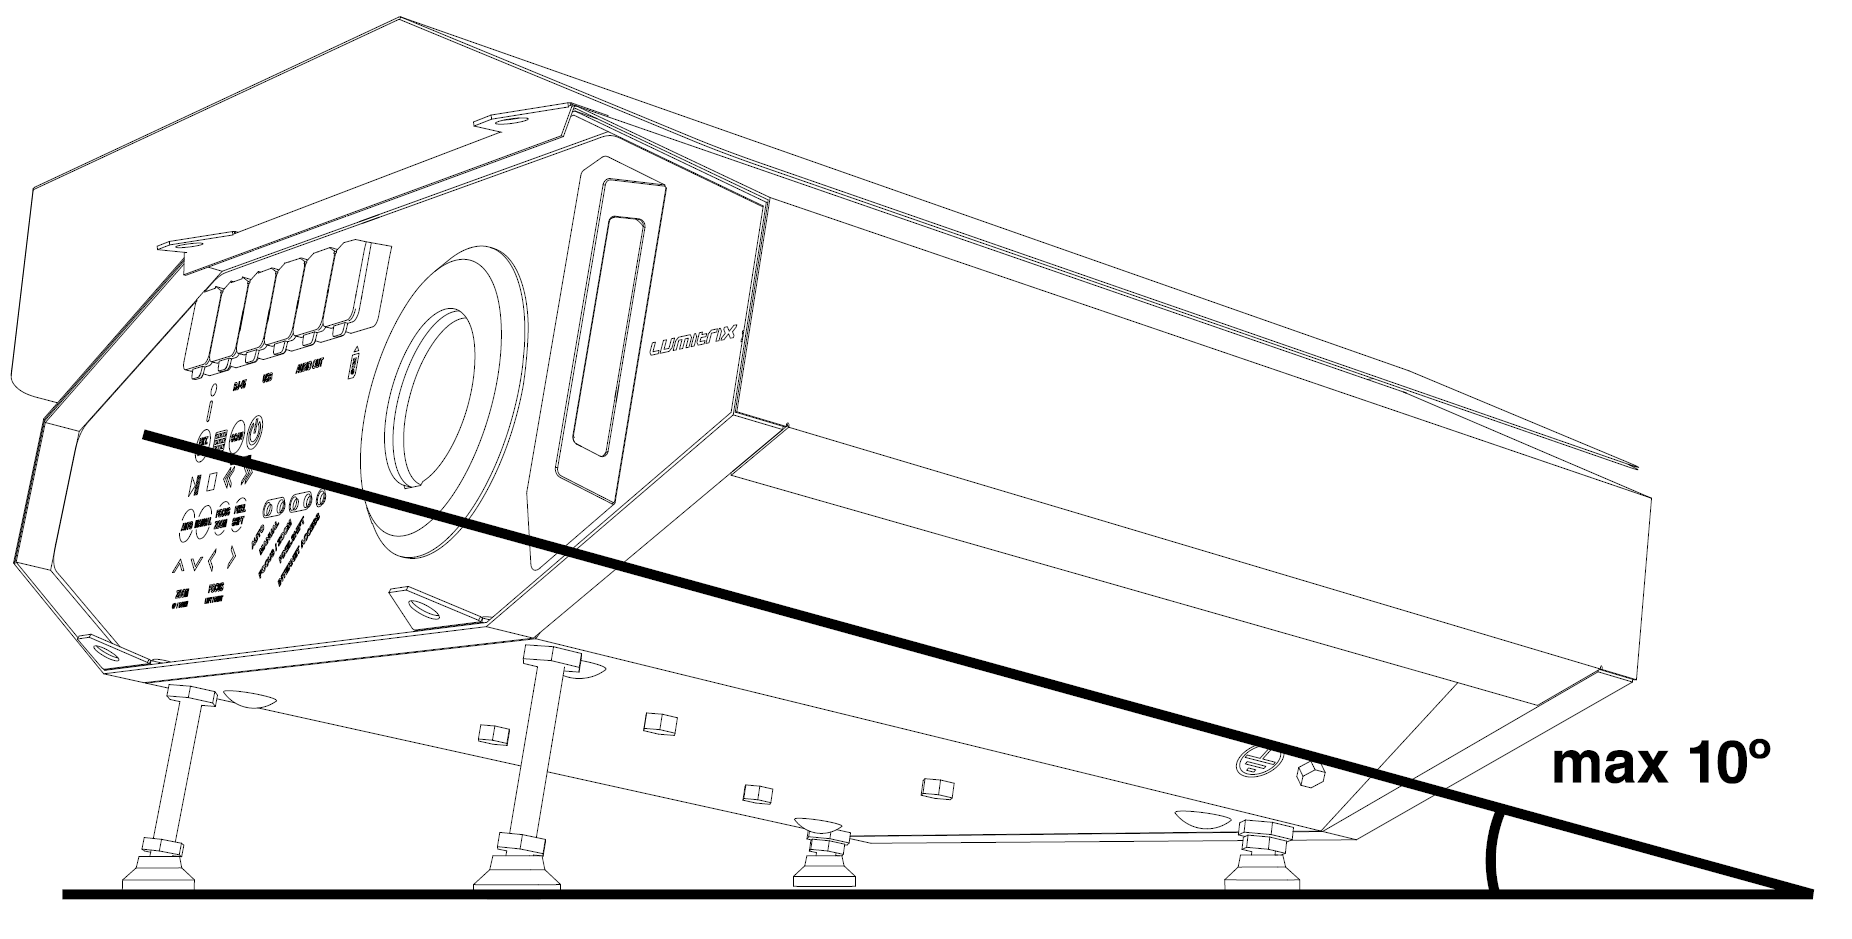
Your Lumitrix T2 Projector can be operated outdoors as long as it is positioned horizontally within allowed angles (see page 15).
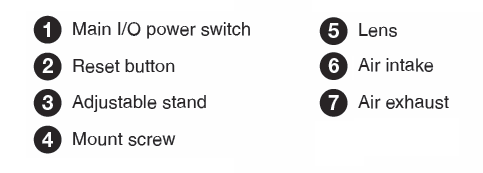
The Projector lamp produces a lot of excessive heat, therefore there are large ventilation openings located on the bottom of the machine, (6) AIR INTAKE and (7) AIR EXHAUST. Always make sure that the ventilation openings are not blocked with any objects, otherwise the Projector might easily overheat. When placing more Lumitrix 2 Projectors side-by-side horizontally always keep a distance of at least 20cm between them.
Always remove the
 POWER LEAD from the (6) AIR INTAKE. When stocking or transporting the Projector it is safe to keep the POWER LEAD in the AIR INTAKE. But it is absolutely necessary to remove it when turning the Projector ON.
The Projector is heavy, therefore always install it carefully and make sure it is securely attached. Avoid installing the device in places where its falling may cause an injury.
Lens
Before turning the Projector ON, always remove the protective lens cap!
Make sure that there are no objects closer than 1 m in the Projector light cone. Strong light might cause fire!
Pointing the Projector towards the sun may cause fire!
Do not look into the Projector's lens when the lamp is on.
Install the Projector carefully to avoid dazzling passers-by with strong light!
Avoid using organic cleaners to clean the lens. Although the lens is made from glass, its frame is plastic and could be damaged with the organic cleaners.
Electricity
The Projector is equipped with the IP67 IEC 60309-1 or IEC 60309-2 plug, which is weather protected and designed for outdoor use. Make sure that you use appropriate socket. Lumitrix company bear no liability for any harm or damage caused to the device by exchanging the original plug.
Always use sufficient ground protection attached to the grounding screw
 to prevent risk of an electric shock!
 - The Projector is certified to work only with the input voltage of 230 V.
- When officially projecting in a public area, the Projector may be connected to the electricity only by a qualified electrician.
- An unstable power supply (frequent blackouts) may cause your Projector to malfunction.
Lightning protection
- Make sure that there is a surge protection (class T1 and T2) installed in the switchboard where you are going to plug the Projector, especially when using the Projector in an area with high risk of lightning.
- When installing the Projector outdoors, always consider using a lightning protection system, especially when the building or the column where you are going to install the Projector is the highest point in the area. (for more information see Lightning protection)
- Avoid using the External Source (EXT SRC) feature in stormy weather. The length of the VGA (D-SUB) cable should not exceed 5 meters.
Batteries
- The Projector is equipped with a UPS tool. If the Projector is not regularly used, it is necessary to plug it to the electricity and turn the Main Switch (1) ON for 2 days at least once every 3 months to recharge the battery. Otherwise, the battery could be damaged, which would disable the UPS tool.
The Projector contains non-rechargeable lithium battery. Only the authorized personnel is allowed to replace the battery. Do not recharge. Replace only with the same or equivalent type battery. When replacing the battery, always check the polarity. Do not expose the battery to direct sunlight.
 4. Control Panel & Basic Functions
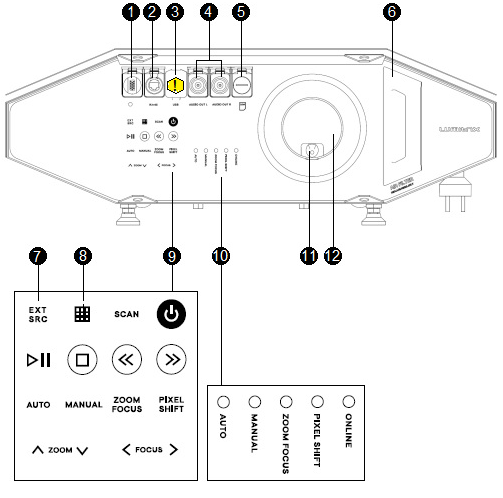
Plug the Lumitrix T2 Projector in the electricity (AC 230V 50Hz). Turn the main power I/O switch to the ‘I’ position and long press the white power button  located on the front panel (9) to start your Projector. The Projector will be ready for use after a few minutes of loading (loading is over once the LED indicators stay in steady setup).
Auto & Manual Operating Modes
The Projector is equipped with built-in scheduler to play a light show automatically at the desired time. In the AUTO mode, the Projector will play a video based on the scheduled program.
Switching to the MANUAL mode will override the scheduler setup and enable manual control of all functions. The mode switching takes some time (30 sec.) due to the lamp warm-up / cool down period. It's indicated by LEDs. When there has been no user activity and no video has played for 15 minutes, the Projector will switch back to the default AUTO mode and turns the lamp OFF in order to save power and lamp life. If you switch to AUTO mode manually, the lamp turns OFF after 15 minutes (if no projection is scheduled).
Basic Setup
Switch to the manual mode using the MANUAL button and wait for the lamp to warm-up. Press the GRID button and use the ZOOM and FOCUS arrow buttons to set the image to a desired area. Use PLAYER BAR controls to run and watch the video. (You can change the arrow buttons mode by pressing the FOCUS ZOOM or PIXELSHIFT buttons. Find out more about Pixelshift on page 10.)
You can use your Lumitrix T2 Projector with an external video source. Press the EXT.SRC. button and plug the D-SUB VGA cable to the connector with the blue indicator. Press the EXT.SRC. button again to switch back to the normal mode.
Switch your Projector OFF by long pressing the white ![]() power button. Wait a few minutes until all LED indicators turn off and then switch the main power I/O switch to the 'O' position.
power button. Wait a few minutes until all LED indicators turn off and then switch the main power I/O switch to the 'O' position.
Power Management
The Projector is equipped with an automatic dehumidification system to prevent moisture causing damage. Once installed outdoors it is important to keep the Projector ON and connected to a reliable permanent power source! If a blackout occurs, the Projector will switch to the sleep mode. Once the power source is restored, the Projector will wake up and continue the show automatically.
Error Indication
When something goes wrong, the LED indicators will show an error status. For the meaning see below.

 5. Connectivity
Although the Lumitrix T2 Projector is able to operate basic functions with no Internet connection, it's strongly recommended to get the device online in order to enable all features (Lumiverse app) and the remote support from the Lumitrix crew. Once online, the Projector is sending the telemetry reports to the Lumitrix support central and can be operated remotely and thus save your show or project in case of any complications.
On the other hand you need to connect to a WebGUI User Interface (UI, as described in next chapter) application to get the full control of your Projector, upload or schedule videos or request software upgrades.
The Projector is equipped with three different network adaptors, so there are three connection possibilities, each applies in a different situation.
- GSM Internet Connection System
To connect the Lumitrix T2 Projector to the Internet and ensure Lumiverse app functionality, remote access and support from the LUMITRIX team. - Ethernet LAN (RJ-45 connectors)
To connect more Lumitrix T2 Projectors between each other and to the Internet in more complex setups. - Wi-Fi Hotspot Access
To connect your computer or smart device to the Lumitrix T2 Projector in order to use the WebGUI User Interface.
GSM Internet Connection System
This feature is intended and designed to provide Internet connection on outdoor installations of Lumitrix T2 Projectors. The data transfer speed and reliability of the GSM network depends on the local conditions and the LTE/3G signal coverage.
The Lumitrix T2 Projector will automatically try to connect to the Internet a few minutes after start up. The Projector is equipped with self-reconnecting system - if the Internet connection breaks, the Projector is trying to reconnect. If the reconnection fails many times, the Projector reboots itself (only when set in the AUTO mode and with no projection running or starting within next 30 minutes). There are basically two conditions of successful GSM Internet connection
- SIM card inserted;
- GSM (LTE or 3G) signal accessibility.
SIM card
If your Projector is not equipped with SIM card yet, you need to get one and insert it into the Projector. Your SIM card must fit following:
- activated SIM card;
- enabled and paid data transfer and data;
- disabled PIN code password.
LTE or 3G Signal Accessibility
Always find out if there is a good LTE or 3G signal coverage in the area where you plan to use the Projector. Be aware of the fact that the accessibility of the GSM signal can be remarkably better outdoors than inside buildings.
Ethernet LAN
There are generally two main reasons for using the Ethernet LAN.
- To get Fast and Reliable Internet Connection in places with poor or no GSM signal coverage or if the firmware update is needed;
- To connect two or more Lumitrix T2 Projectors in Multiple Projectors Setup.
Fast and Reliable Internet Connection
There is a good reason to use the Ethernet LAN connection under the following circumstances:
- You need to use the Projector in location with very poor or no LTE or 3G signal
- You need to claim a software upgrade of your Lumitrix T2 Projector
- You plan to use the Projector on a high priority project, where you want to eliminate as many risks as possible
The Setup steps:
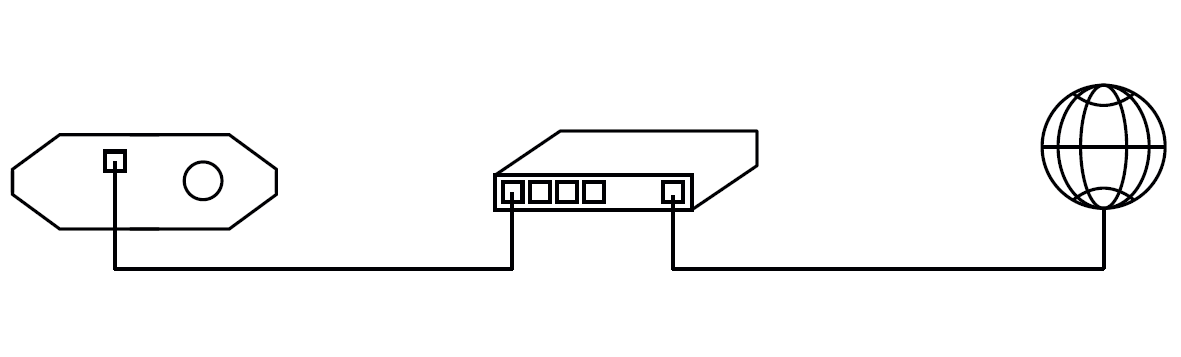
You need to connect the router connected to the Internet. The router needs to have a DHCP enabled and spare RJ-45 socket (the sockets on most routers/switches are ususally marked only with numbers from 1 to n)
- Use the shielded straight thru LAN cable (FTP, STP, S/FTP), the cable CAT 5 or CAT 6 with the RJ-45 connectors. Turn off the machine. Connect one end of the cable to the spare RJ-45 socket on the router and the other one to the Projector's RJ-45 socket located on the front panel and then turn on the machine.
The Projector will detect the network and connect automatically. The ON-LINE INDICATOR LED should switch on in a minute.
Troubleshooting:
- Restart the router.
- Reboot or reset the Projector.
- Make sure that the router is connected to the Internet and the DHCP is enabled.
- Check the router settings (or ask your company's network administrator to do so). There can be some restrictions which can for some reason limit the connection.
- Check network address range assigned from DHCP server. Network address has to be IPv4 and some ranges are denied (10.1.1.0/24 and 172.16.0.0/12).
- Check if all ports are open.
Multiple Projectors Setup
Two or more Lumitrix T Projectors can be connected to work together. This brings the possibility of more complex installations such as 360° projection mapping around the building or even more buildings or structures involved in one synchronized show. In order to achieve this, Lumitrix T2 Projector allows two main features.
- Synchronized Playback - one of the Projectors (called MASTER) sends sync ticks to the others, to ensure the time synchronization of the video playback.
- Edge Blending - the Projector is equipped with an Edge Blending software tool. This feature helps you avoid the unattractive sharp band on the areas where images from two Projectors overlap.
How to make this work:
1. Connect the Projectors with the shielded LAN (FTP, STP, S/FTP) cables CAT 5 or CAT 6 with RJ-45 connectors to form a network.
Recommended Setup
In this setup you connect two or more Projectors with the router or switch. The router can be connected to the Internet to get the benefits of the cable Internet connection.
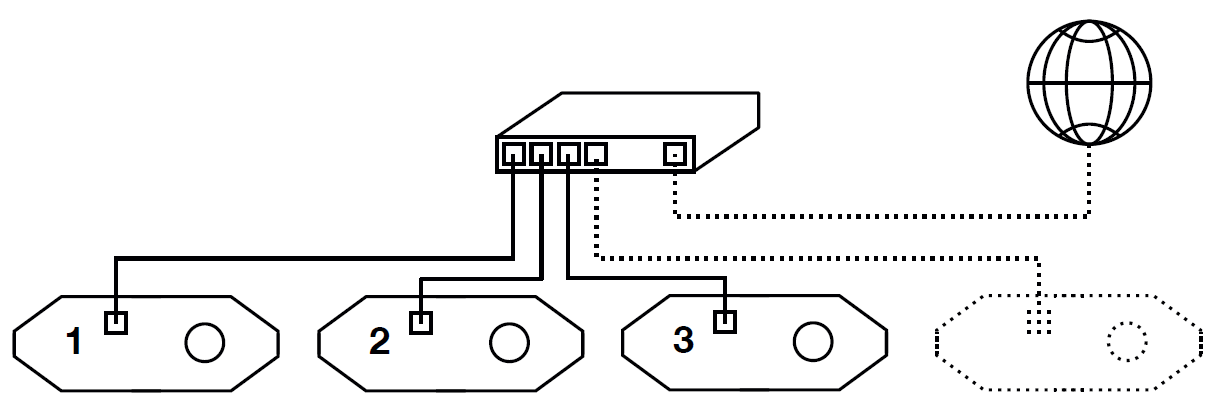
Advantages:
- You can use up to 250 Projectors
- You can connect the router to the Internet to get more reliable and faster Internet connection
Basic Setup
In this case you would connect two Projectors together using one shielded LAN cable. You can use both the straight cable as well as the crossover cable.

Disadvantages:
- You can connect maximum of two Projectors
- You must rely on the GSM to ensure the Internet connection
2. Set one Projector as the MASTER. Connect to the WebGUI User Interface of one Projector and click on the ADVANCED SETTINGS button below the SETTINGS tab. Click on the SET MASTER button on the bottom of the dialog. This will set that one Projector as the MASTER and all the other connected Projectors as the SLAVES.
3. The Multiple Projector Setup has been set.
- To set a synchronized projection see Supported Video Formats to learn which video formats you need and Scheduler to learn how to schedule the synchronized projection.
- To use Edge Blending feature contact support@lumitrix.eu to get the guidelines.
Wi-Fi Hotspot Access 
The Wi-Fi adapter in the Lumitrix T2 Projector is not designed to connect the Projector to the Internet. It's intended for connecting your computer (*) or smart device to the Projector, to get the full control of all Projector's features using the WebGUI User Interface application. The Projector creates an ad-hoc Wi-Fi network available within a distance of approx. 40 meters from the Projector. This is useful for the on site setup.
Turn on the Wi-Fi on your mobile device/computer (**) and connect to the Wi-Fi network called TPHXXX (***).
The default password is: see printed manual or contact support- Open the Google Chrome browser and type 10.1.1.1 in the address bar.
- Select your device: PHONE, TABLET or COMPUTER.
- You are ready to use the Lumitrix T2 WebGUI User Interface (described in Chapter 6. I User Interface )
* This feature is not available on Mac computers with Mac OS X Maverics as it does not support ad-hoc networks
** Some devices (especially iOS powered ones) require special settings for TPHXXX hotspot.
Open the Wi-Fi settings, open the TPHXXX network, switch to the IP ADRESS STATIC and use the following setup:
IP ADRESS: 10.1.1.25
SUBNET MASK: 255.255.255.0
*** XXX in TPHXXX stands for the product number, for example TPH201. See the large font three digit number on all sides of the LUMITRIX T2 Projector.
Wi-Fi Troubleshooting
- On some of the Android devices the TPHXXX network would appear among Unknown networks, for which you have to scroll down to the very bottom of the Wi-Fi networks list.
- iPhone / iPad users: If experiencing issues connecting to WebGUI interface, change your GOOGLE CHROME settings. Go to GOOGLE CHROME, go to SETTINGS and select REQUEST DESKTOP SITE.
- The Wi-Fi antenna is placed on the front panel of the Lumitrix T2 Projector and emits in the same direction as the Projector projects, therefore the connection can be worse if your computer/smart device is located behind the Projector.
- Try to switch the Wi-Fi on your device OFF and ON again
- On some devices it may be necessary to switch the GSM data connection OFF in order to connect to the TPHXXX.
- In some cases, your device might prefer a different Wi-Fi network to the TPHXXX. In this case, delete the other network and then try to connect to the TPHXXX.
- If you tried the above described steps and it still appears that there is no TPHXXX Wi-Fi network available, try to turn the Lumitrix T2 Projector itself OFF and ON again if possible. If it is not possible or it didn't help contact support@lumitrix.eu
 6. WebGUI User Interface
You need to access the WebGUI User Interface to fully control and configure all functions of your Lumitrix T2 Projector. Use your mobile device or computer to configure the Lumitrix T2 Projector for a permanent light show installation. Try uploading a new video file in the player section and use the scheduler to create a timetable for this video.
Follow the steps described in Wi-Fi Hotspot Access in the previous chapter to connect to the WebGUI User Interface.
The WebGUI User Interface can be reached through the Internet (VPN tunnel) too. Contact the LUMITRIX support on support@lumitrix.eu to get more information and the guidelines.
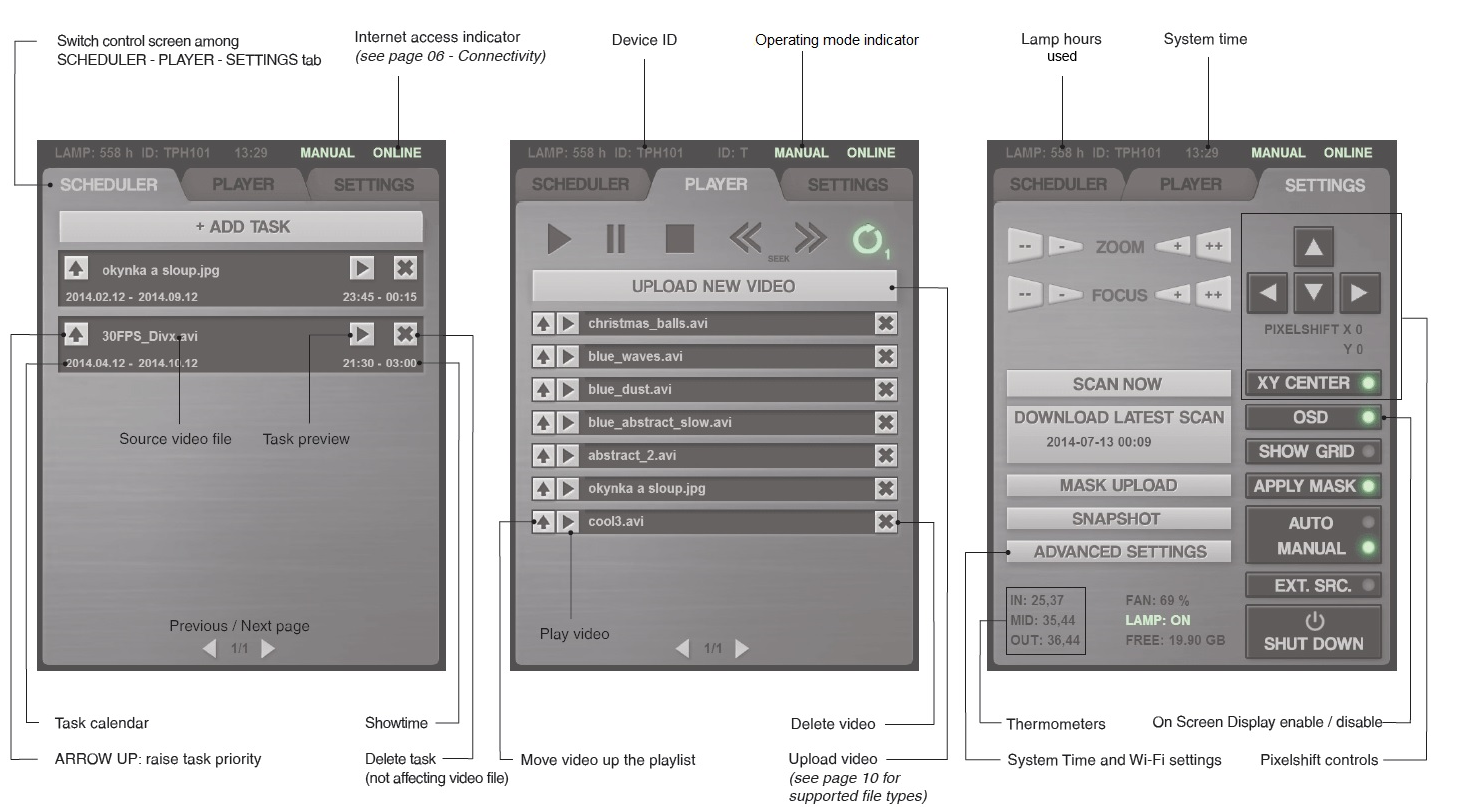
 7. Player
Use the PLAYER to upload and play new video files. Switch to the MANUAL mode to enable the PLAYER tab.
Available video storage memory: 20 GB
Supported Video Formats
Supported frame rate: 25 - 50 FPS
Maximal file size: 4 GB
Native format
- This format provides best quality without any reconverting.
- Supported video containers: .avi
- Supported video formats: MPEG-4 Part 2 (*)
- Supported audio formats(**): AAC, MP3
- Supported image formats: .png a .jpg
- Rendered video progressively (no P or B frames)
* Local bit rate of the video file must not exceed 20 Mbit/s
** Only the video file of the MASTER Projector can include the audio track in synchronized projection.
Other formats
- You can use common video formats, but a video will be automatically reconverted to native format during upload video to a device.
- The reconverting of a video can cause decreasing of a quality and extends a time of uploading.
 8. Scheduler
Use the Scheduler tool to set up your Lumitrix T2 Projector for long term automatic light show.
- Create a new task using the ADD TASK button. Set the video source. (If the video hasn't been uploaded to the Lumitrix T2 Projector's memory, switch to the PLAYER tab and select UPLOAD NEW VIDEO first).
- Set the calendars for the first and last day of the projection
- Set the showtime for the projection
- Check the Synchronized checkbox if you want your projection to be synchronized with other projectors in Multiple Projectors Setup. Do not check Synchronized if using single projector setup.
- Select the ADD TASK button.
- Once you have created the tasks, switch to the AUTO mode to allow the scheduler to take control of the Projector.
You can create multiple tasks to play various videos with a certain timetable. If two tasks are set to play at the same time, the task with higher priority (with higher position in the list) will be preferred. You can increase the task priority with the ARROW UP button. (see User Interface)
 9. Pixelshift
The Pixelshift tool is designed to fine tune the position of the projected image. The Pixelshift is a global parameter and affects all videos and the Mask. Use the Pixelshift arrows in the User Interface / Settings Tab to move the projected picture in the desired direction. Use the XY CENTER button to easily center the Pixelshift to the default 0;0 position.
You can control the Pixelshift also using the front panel buttons. Use the PIXELSHIFT button and switch to the Pixelshift mode first (see the LED indicators displaying currently active mode). Now, use the ARROW BUTTONS to move the image up, down, left and right. When you’ve finished, switch back to the FOCUS / ZOOM mode.
 10. Camera and Scanner
The Lumitrix T2 Projector is equipped with the 5Mpix night vision camera. The main purpose of the camera is the Scanner tool (described in the next paragraph). However, this camera is not designed to take a decent picture of the projection.
The Scanner tool is designed to simplify the video production process. Once installed on site, you need to scan the building. This gives you a possibility to create the video content remotely, from the comfort of your home or office. This process is fully automated, takes approx. 5 minutes and needs to run in the darkness. The darker it is, the better. Basically the Projector is projecting accurate shapes on the building and takes pictures of it. Following steps will guide you through both parts of scanning process.
- Turn off all sources of ambient light and avoid any object to move in the projection area during the scan. If this occurs, run the scanner again.
- Switch to the MANUAL mode and wait until the lamp is ON.
- Make sure your Projector is set properly in order to project on the desired area using the GRID and the FOCUS / ZOOM functions. Focusing on the image is especially important in order to obtain a satisfactory scanner result.
- Make sure that nothing moves within the light cone.
- Dim all sources of ambient light.
- Switch the GRID off.
- Start the scanner using the SCAN button.
- Wait approx. 5 minutes until the scan process is completed.
- Use the DOWNLOAD LATEST SCAN button in the WebGUI Interface / Settings Tab and get your scan result image. (.png)
The scan result is an image capturing the accurate position of the building geometry. Use this file as a background for your video mapping project to ensure that the objects in your video/animation will fit the geometry of the building or structure that you are projecting on.
 11. Mask
The Mask tool is designed to cut out the light emission to the undesired areas, such as windows etc. You need the Scan Result Image in order to create a Mask file. The Mask has to be uncompressed .png with alpha. Paint the areas where you want no light emission with the black color (RGB 0,0,0). Use the transparency effect on the areas where you want to project the show. Upload the Mask using the MASK UPLOAD button in the WebGUI User Interface / Settings Tab. Activate / deactivate the Mask using the APPLY MASK button.

 12. Audio
The Projector is equipped with two XLR balanced audio LINE OUT connectors (left/right) with surge protection and the ground disconnected from the signal path. The shield conductor is grounded to the chassis of the Projector. The reasons for using balanced the audio are better transmission of audio signal on long distances and the security of the device. Therefore we recommend to use the balance audio inputs on the amplifiers/mix consoles which you are going to use to amplify the sound.
 13. Quick Walkthrough of a Basic Video Mapping with the Lumitrix T2 Projector
- Find a suitable location for the Lumitrix T2 Projector and make a test show to find out, whether there is enough light power for your project.
- Install the Projector to its final position and make sure it is securely attached and it is positioned within the allowed angles. (see Correct Outdoor Positioning and Attachment System)
- Make sure that your Projector is connected to a reliable power source and that you keep the machine turned ON!
- Make sure there is no risk of lightning or install lightning protection. (for more information see chapter on Lightning protection)
- Connect the Lumitrix T2 Projector to the Internet. (see Connectivity)
- Run through the SCAN process to get the background image for the video production (see Camera and Scanner)
- You have two options to get the video mapping content.
- Contact the LUMITRIX team at info@lumitrix.eu to order the video mapping content. Our creative team can provide you with a wide range of content. You can get a very basic static demo, a stunning epic 3D show with sound effects and music and naturally everything between that. Obviously, the more complex the video is the more time the creation takes.
- Make your own video content using a third party's software such as Adobe Photoshop or Aftereffects. Use the SCAN result file as the background when creating your images/animations, to fit the geometry of the the object that you are projecting on. Create the Mask image to mask out the objects that you don't want to illuminate (i.e. windows) if necessary. See Supported Video Formats to learn what kind of video file you need to obtain as a result.
- Upload the video mapping content into your Lumitrix T2 Projector. (see User Interface)
- Upload the Mask image, if necessary. (see Mask chapter).
- Set the Scheduler to play the show at desired time. (see the chapter on Scheduler)
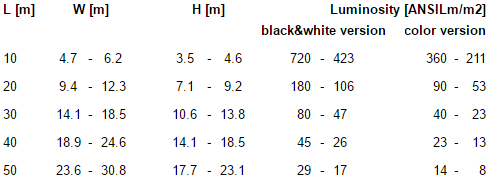
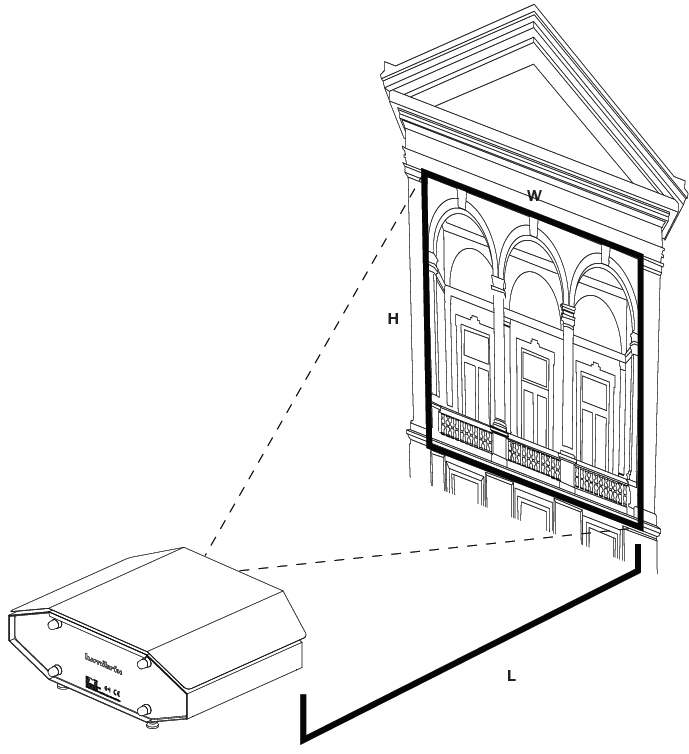
 14. Correct Outdoor Positioning

 15. Attachment System
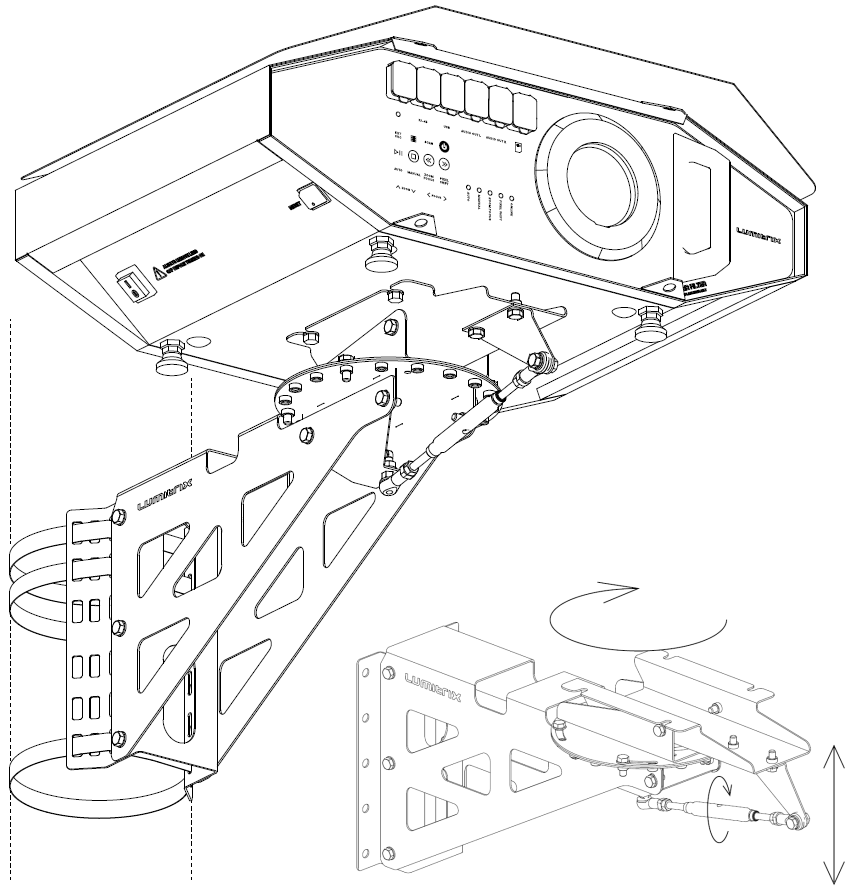
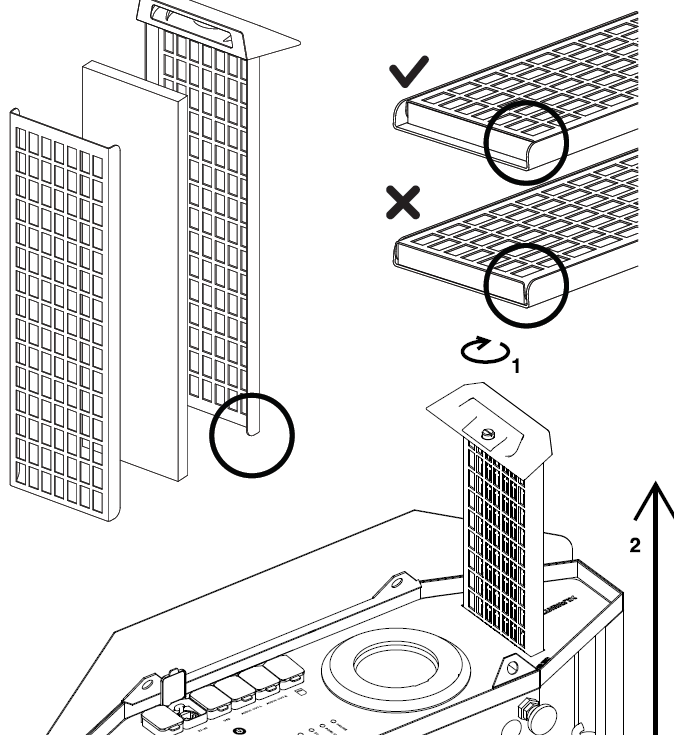
Your Typhoon Projector is supplied with the attachment system. There are two interchangeable mounts, one for the wall and one for the installation on the post. Make sure that you use sufficient fixture and always think SAFETY FIRST!
To get to know how to build your attachment see the images on the right.
- Fixture to mount to the post;
- Wall fixture mount.
Lightning Protection
The Lightning protection is generally needed when the building or the column you are going to install the Projector on is the highest point in the area. The risk of lightning depends on many factors including the altitude, air humidity, etc. For example, an installation on the a pillar located on the sea shore or on the top of the mountain are definitely considered as a hazardous installation. On the other hand, an installation in the area with high density of higher buildings equipped with lightning conductors can be considered as quite safe.
A basic lightning protection system consists of:
- The T1 and T2 surge protection installed in the power switchboard where the Projector is connected
- A well grounded lightning rod installed in the building or structure where the Projector is mounted
 16.Maintenance
Lamp
The Lamp life span is 2500 hours. See the top left corner of the User Interface to get informed about the lamp hours. You should consider the lamp replacement once when your get close to the 2500 hours. Contact support@lumitrix.eu to get lamp replacement guidelines or visit www.lumitrix.eu/outdoor/support.
Lens
Any dirt on the Projector lens might affect the light show quality and scanner results. Clean the lens with the common soft glass cleaning cloth. You can use alcohol-based liquid detergents. Avoid using organic cleaners. Although the lens is made from glass, its frame is plastic - and could be damaged with the organic cleaners.
Air filter
The Typhoon T2 Projector is equipped with inter-change-able air-filter. Filter replacement period depends on the air quality in your area, we recommend to replace filter every 300 light hours or every two months, whichever comes first. Your Projector is supplied with 2 spare air filters.
 17. Troubleshooting
In case of a Projector malfunction, proceed through the following steps. Refer to the chapter on Technical data to find the necessary buttons:
- Reboot
To resolve a malfunction issue, try the REBOOT command from the SHUTDOWN menu in the User Interface / Settings Tab. The LED indicators on the front panel will start flashing and showing the OFF sequence. After turning OFF the Projector will reboot itself and the LED indicators will start showing the loading sequence. Once the Projector has loaded, it should run normally. If not, follow the next step. - Turn OFF and ON again
Resetting didn’t help? Turn the Projector OFF by pressing the white power button, wait approx. 3 minutes until the LED indicators stops flashing. Switch the main power I/O button to the ‘O’ position, wait for 5 seconds and turn the machine back ON.
Once the Projector has loaded, it should run normally. If not, follow the next step.
- Factory Reset
The previous step didn't help? Factory reset will erase your data and restore the system to its original setup. Turn the machine OFF and wait for 5 seconds. Press the white power button for 10 seconds, release it and press the EXT SRC button for another 10 seconds until the blue LED swithces ON, which indicates that the Projector is now loading and restoring the factory settings. Once the blue LED indicator turns off you’re ready to go!
Didn’t help? Contact our support!
 18. Technical Support
E-mail: support@lumitrix.eu
Phone: +420 728 308 610
 19. Software Upgrade
LUMITRIX company is constantly developing new features, upgrades, security systems and bug fixes for the T2 series Projectors. We need to access the Projector remotely to perform the necessary firmware updates. From time to time, we will kindly ask you to connect the Projector to the Internet with the ethernet cable (as described in the chapter on Ethernet LAN ) and make sure that the Internet ACCESS indicator is active. Afterwards, the LUMITRIX staff will remotely access your Projector and install the latest updates.