Quick WebGUI Overview
This section will teach you how to control your Lumitrix indoor device through a web based graphical user interface, or WebGUI, using your phone or computer directly through the provided wireless connection or even remotely from anywhere on the planet, if your device is connected to the internet (for more detailed information about this topic, please refer to Getting It Online section of this guide).
Connecting to WebGUI over Wi-Fi
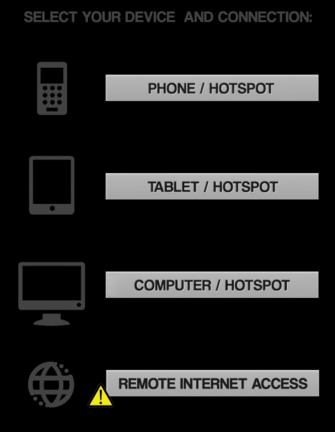
By default, Lumitrix indoor provides its own Wi-Fi network which can be used to access the WebGUI. Simply connect to a Wi-Fi network with the same name as the serial number of your device (i.e. lb1004 - you can find this number on the back panel of your device) using the default Wi-Fi password (see printed manual or contact support) and in your Chrome browser go to the address http://10.1.1.2 - and choose one of the top three options, depending on the type of computer you are connecting from (phone, tablet or desktop). Note, that only Chrome web browser is fully supported, alternatives, such as MS Internet Explorer, Safari or Mozilla Firefox may not provide full functionality.
It is also strongly advised to change your default Wi-Fi password as soon as possible (you will find out how to do that here). If you have your device currently connected to a Wi-Fi for an Internet connection, you can override this for one boot session until restart by holding a front panel ON button for approximately 15-20 seconds. A turquoise color will be shown by the status LED for the entire session, and you will be able to access the WebGUI via a Wi-Fi. However, your device will be offline, if Wi-Fi is the only means of it connection to the internet.
Connecting to WebGUI Using Remote Access
You can also connect to WebGUI from anywhere in the world using a VPN program, such as OpenVPN for Windows or Tunnelblick for Mac with the provided VPN encryption keys. On Windows, you install OpenVPN and activate your VPN key like this:
- Make sure you have installed OpenVPN application. If not, download it from here and install
- Locate the OpenVPN\Config folder, in Program files
- Locate your configuration files, sent to you by Lumitrix staff (It’s set of 4-6 files with extensions .crt, .conf, .key, .ovpn)
- Copy your configuration files into Config folder. Generally there should be just one set of configuration files or more sets organized in subfolders
- Start OpenVPN
- OpenVPN should connect automatically - check the OpenVPN icon in system tray. If looks like a grey unlocked display, you are not connected, if yellow unlocked display, you are currently attempting to connect and finally locked green display means you have successfully connected to Lumitrix private encrypted network
On Mac, the way to configure Tunnelblick and activate your VPN key is:
- Make sure you have installed Tunnelblick application. If not, download it from here and install
- Open a Tunnelblick application from application launcher
- Click the “+” icon in bottom left corner to add a configuration
- Click “I have configuration files”
- Click “OpenVPN Configuration”
- Follow the instructions on next dialog and click done when done. It guides you thru the process of creating the new configuration for Tunnelblick connection using your OpenVPN configuration files
- Now you should be able to select this newly created configuration and connect to Lumitrix private encrypted network
Once you are connected to the Lumitrix VPN, go to your Chrome browser and visit the address of your device you were provided along with the VPN keys (i.e. http:.//172.16.x.x). There, select the last option (Remote Internet Access). Note, that this option only works on your laptop or desktop computer - both Android nor iOS phones and tablets currently support custom VPN connections.
Top Information Bar
WebGUI is divided into three general sections - tabs. All three, however, have some basic onfo in common, located in the very top information bar.
You can always see:
- The number of hours your projector lamp has been used - this is good for planning your lamp replacement.
- The serial number of your device
- Current device internal time
- Weather it is in automatic scheduled or manual player mode
- Online status of the device

Scheduler Tab
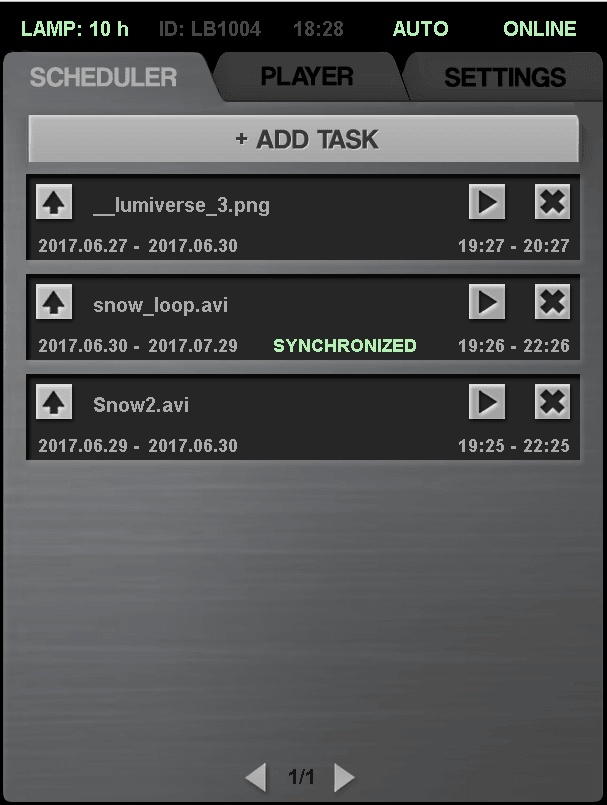
In this tab, you can plan and remove shows (videos or images) you had previously uploaded to your device. If your device is set to manage projector automatically, it will light it up before each show and then turn it off to save lamp time. This mode is especially useful for routine tasks of permanently placed projections.
Each task added will have a start and end time, the first and last date it will run on and of course some associated media, typically video loop. You can also make it play the video synchronized, should you have more Lumibox indoor and/or outdoor devices on the same network. Tasks can be reordered by the up arrow on the left of each task, or removed by the x button on the right. The play button on the right plays or stops preview of the associated media, but not in auto mode, as this may cause unwanted intrusions into currently scheduled task. The order of tasks is important - should some tasks have conflicting times associated to them, the task higher up in the list takes priority. This is useful for advanced task planning (i.e. one task playing the whole day, while one interrupting it just for two minutes on midday). Finally, arrows on the bottom list through multiple pages of tasks, should you have more than 6 planned.
Player Tab
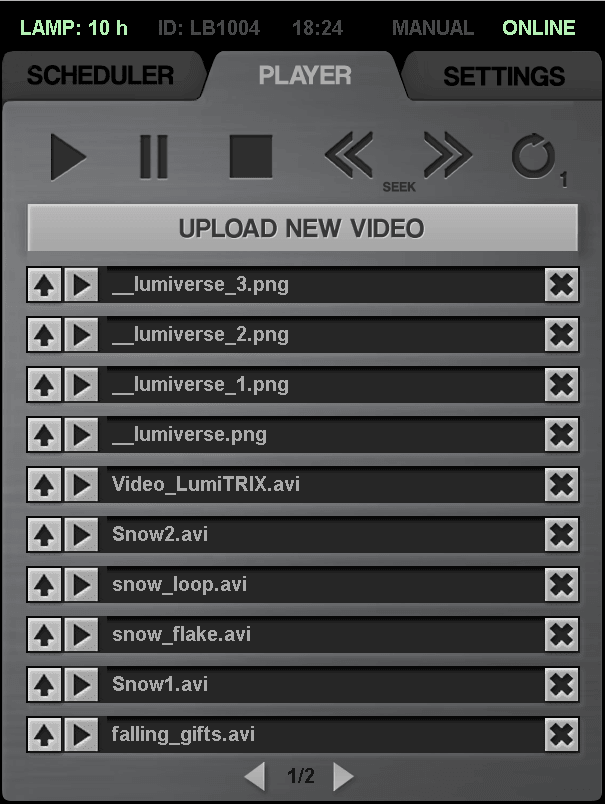
In this tab you can upload new media, view all uploaded media, and in manual mode play the media uploaded, not unlike any other media player (the repeat button here functions as “repeat one”).
Depending on your device, there may be some number of special “media” files starting with double underscore (i.e. “__lumiverse.png”) These represent individual Lumiverse scenes, or current Lumiverse scene in the case of “__lumiverse.png” as media objects, so they can be scheduled or activated using WebGUI. For more intuitive and preferred way to use Lumiverse, please refer to Lumiverse section of this manual.
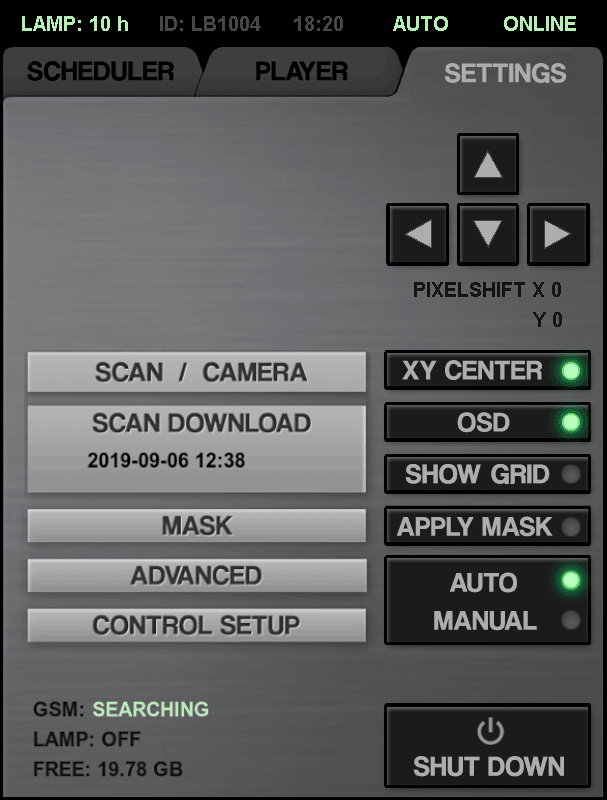
Settings Tab
Settings tab has three subsections, each with a dedicated subsection of this manual. Options found directly in this tab include:
- Pixelshift correction - useful for fine tuning the position of normal long term projection mapping media. In other cases, Lumiverse is the preferred method for for placing media into projections
- Center reset button for pixelshift correction
- OSD On Screen DIsplay - information shown directly into projection (i.e. currently playing video)
- Show grid - a special picture useful for tuning the physical placement of the projector
- Apply mask - general switch for mask overlay - individual components of the mask overlay are set in the “MASK” subsection
- Auto vs Manual mode switch
- Shutdown menu - restarting and permanently shutting down your device (warning: physical access to the device HW switch is needed if it is shut down from this menu, in order to switch it on again)
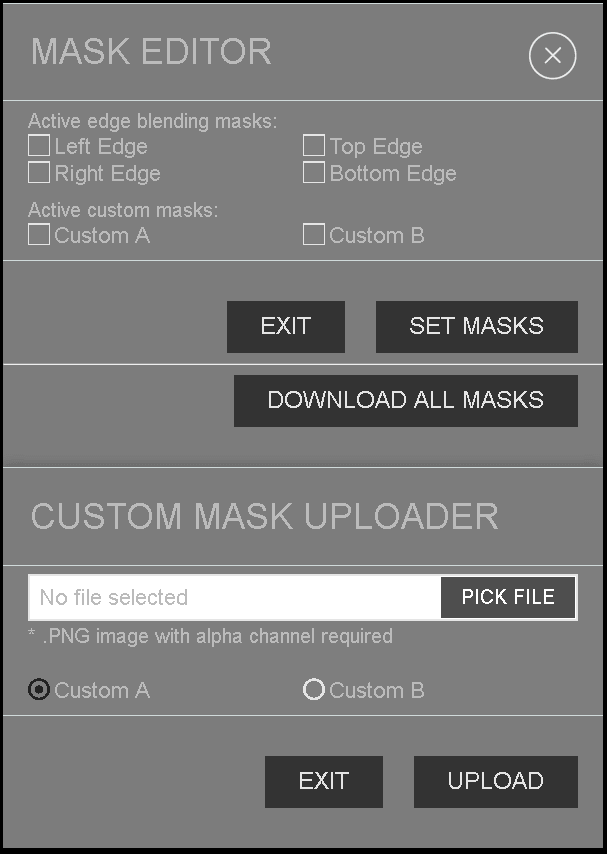
Settings Tab -> Mask
Here, the individual layers of the Mask overlay are activated or deactivated. There are four masks for each edge of the projector dedicated for soft edge blending process used to seamlessly connect two or more projections into a single big image. These are generated automatically by the blending process. However, up to two custom mask layers can be uploaded and controlled here. All the mask images must be 4 channel .PNG images (with a red, green, blue and transparency components). All transparency in the masks will work as expected.
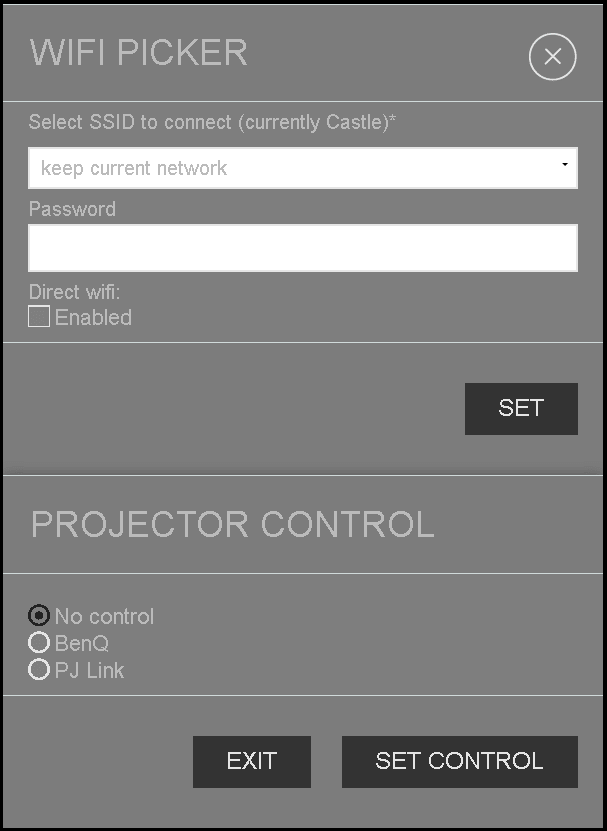
Settings Tab -> Control Setup
In the lower “PROJECTOR CONTROL” section of this tab you can enable or disable direct control of your Lumitrix indoor over the attached projector:
- No control - you have to manually switch projector on and off. This is useful if projector is shared with another video source
- BenQ - allows control of the BenQ TH682ST projector via the provided yellow serial cable. Note, that the projector must be configured for this. If you have provided your own BenQ projector, please refer to the Initial Configuration section of this manual.
- PJLink - experimental option to control any projector with PJLink capability over a LAN cable. Note, that projector LAN address must be set to 192.168.1.11 - however, this feature may or may not work, depending on the manufacturers custom modifications to PJLink standard protocol.
At the top of the section, you can specify a Wi-Fi network to connect to using the drop down list (all networks visible to the device are listed here), and provide a password to this network. If you just want to change the password to currently set network, but you are not in the range of said network, just use the “keep current network” option. Finally, a checkbox “Direct Wi-Fi” can be toggled. In its checked state, the device does not connect to an Internet using the provided Wi-Fi network credentials, but creates its own hot-spot named as the serial number of the device (found on the back panel), to allow for connecting to WebGUI. If left unchecked, it will seek the provided Wi-Fi network and attempt to connect and get online. This change needs restart to take place. If you ever want to override this choice, you can do that for one boot session until restart by holding a front panel ON button for approximately 15-20 seconds. A turquoise color will be shown by the status LED for the entire session, and you will be able to access the WebGUI via a Wi-Fi. However, your device will be offline, if Wi-Fi is the only means of it connection to the internet.
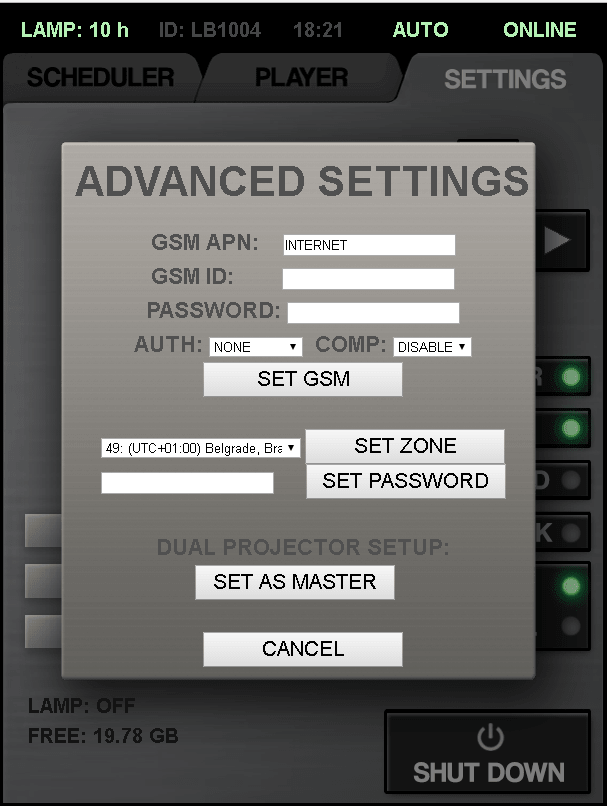
Settings Tab -> Advanced
Here, GSM network access settings are changed in order for GSM/3G/LTE connection to be configured properly, multiple setup configuration master/slave hierarchy is created and time zone for your device is set. Current time and daylight savings state, if applicable for your time zone, is synchronized over the Internet and needs Internet connection to work properly.
Also, a default password for an ad-hoc wifi used to connect to this WebGUI can be changed, and it is strongly recommended to change your default password immediately and then change your password periodically. Consider the default password as public knowledge, very weak to brute force attacks, and by no means it should be left unchanged beyond the first use of the device. If you ever forget your password, you can always put your device online using the LAN cable method and access it through the provided VPN keys to change it.